Python Discord Weather Bot Tutorial
A how-to tutorial on building a Python Discord weather bot using discord.py and the OpenWeatherMap API.
Python Discord Weather Bot Tutorial
Introduction
Are you looking for your next Python project to improve your skills? Creating a Discord bot might be the perfect choice, as it allows you to interact with it using Discord chat. In this tutorial, you will learn how to create a Discord bot in Python that uses a third-party API to fetch weather data.
By the end of this article, you will learn:
- How to set up a Discord token.
- How to set up an OpenWeatherMap API token.
- How to create your first Discord bot.
- How to interact with the OpenWeatherMap API.
Prerequisites
How to Make a Discord Bot in Discord Developer Portal
Before you can dive into writing Python code for your application, you have to set up a few components:
- An application
- A bot
- A guild
The following steps assume you already have a Discord account. You can create a new account on Discord website.
Create a Discord Application
An application allows you to interact with Discord’s API.
To create an application, go to the Discord Developer Portal and click on “New Application” 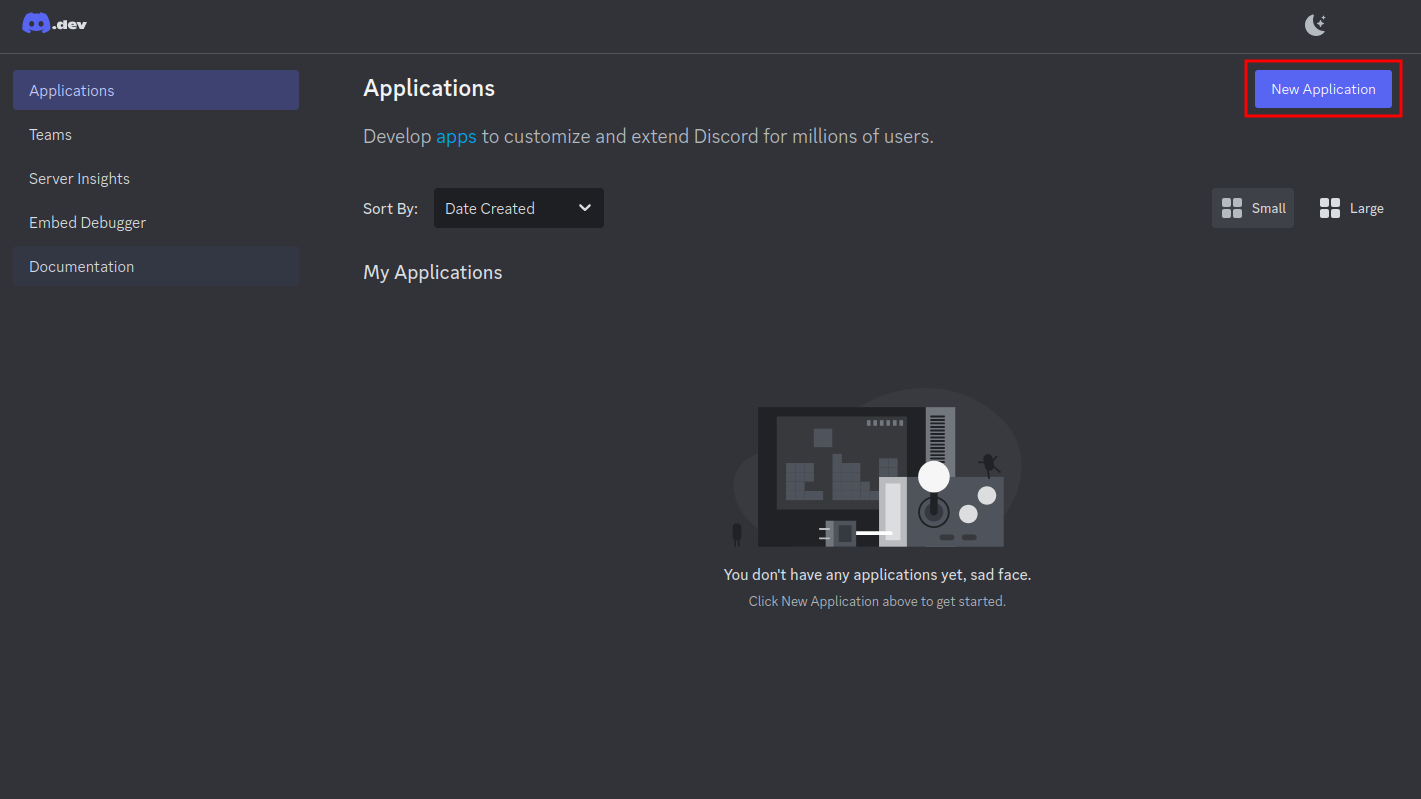 The Discord Developer Portal
Next, you will be prompted to enter an application name and agree to the Discord Developer Terms of Service and the Discord Developer Policy.
Create a Discord Bot
Once you have created a new application, navigate to the Bot tab. Here you can set the bot’s username and icon. 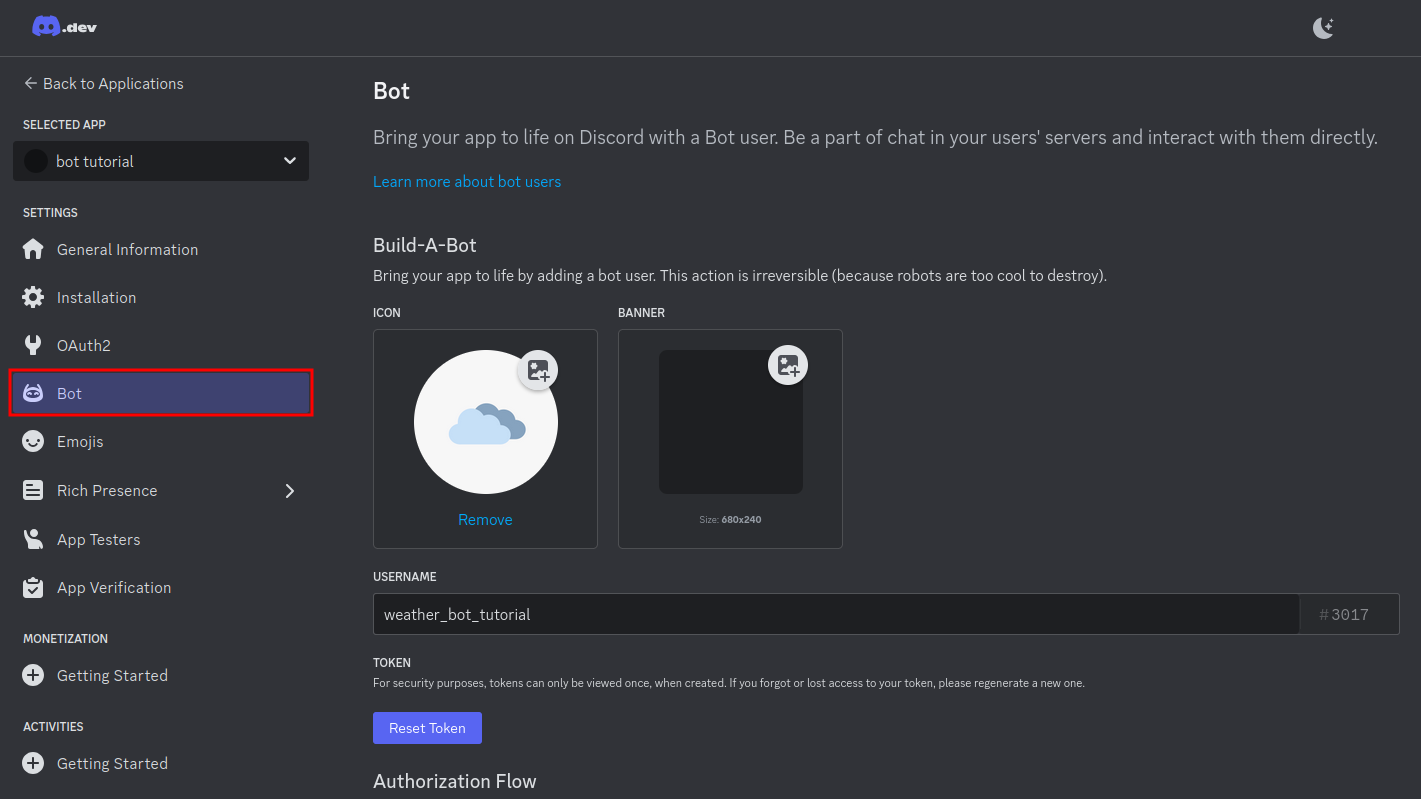 The Discord Developer Portal Bot tab
Create a Discord Guild
According to a Discord support article, a guild is a small, exclusive server where people who regularly play games together collaborate, compete, and hang out. Guilds recruit members by application and provide their members with a sense of tight-knit community, support, and shared identity. In other words, guilds are better known as servers, which are a collection of voice and text channels.
The terms server and guild are interchangeable, however, guild is a term that is used in API whereas server is used in Discord application.
To create a guild, open the Discord application and click on “Add a Server”: 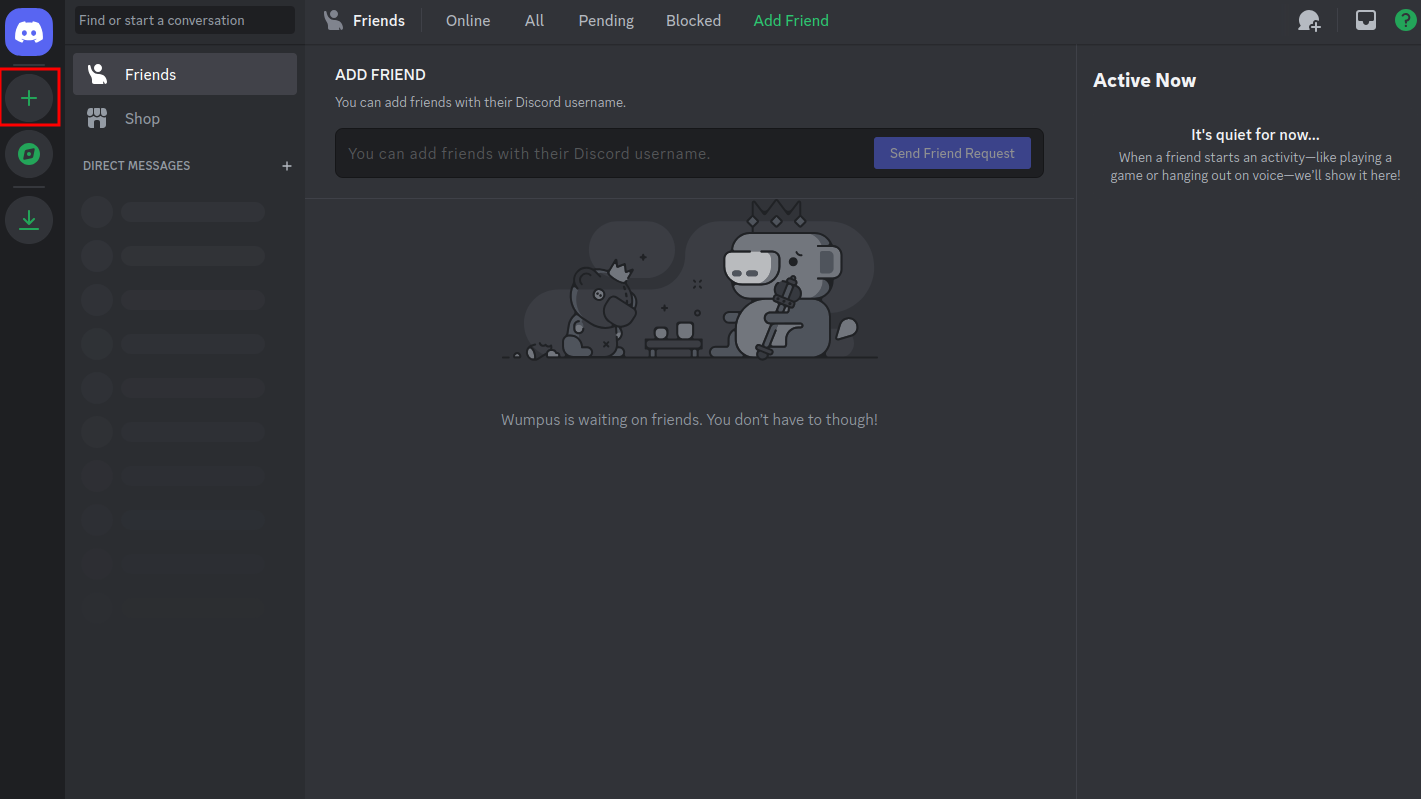 The Discord application
Then enter the guild name, and click on “Create”.
Add Bot to a Discord Guild
Now that you have created an application, a bot, and a guild, it is time to add your new bot to the guild. To do this, return to the Discord Developer Portal and go to the OAuth2 tab: 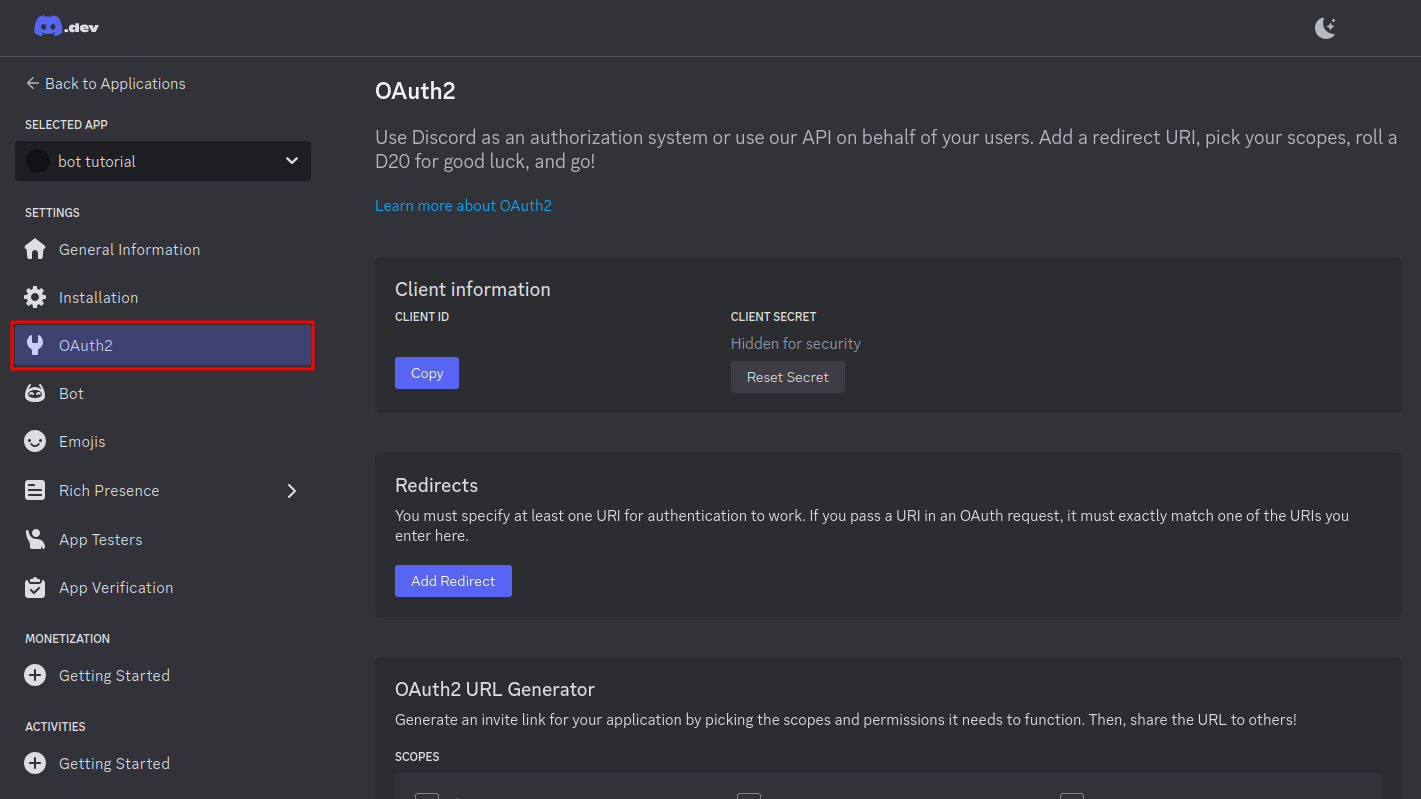 The Discord Developer Portal
Here, scroll down to the OAuth2 URL Generator and select bot within the scopes. After selecting the bot scope, a bot permissions list will appear. In the bot permissions list, select Send Messages and View Channels: 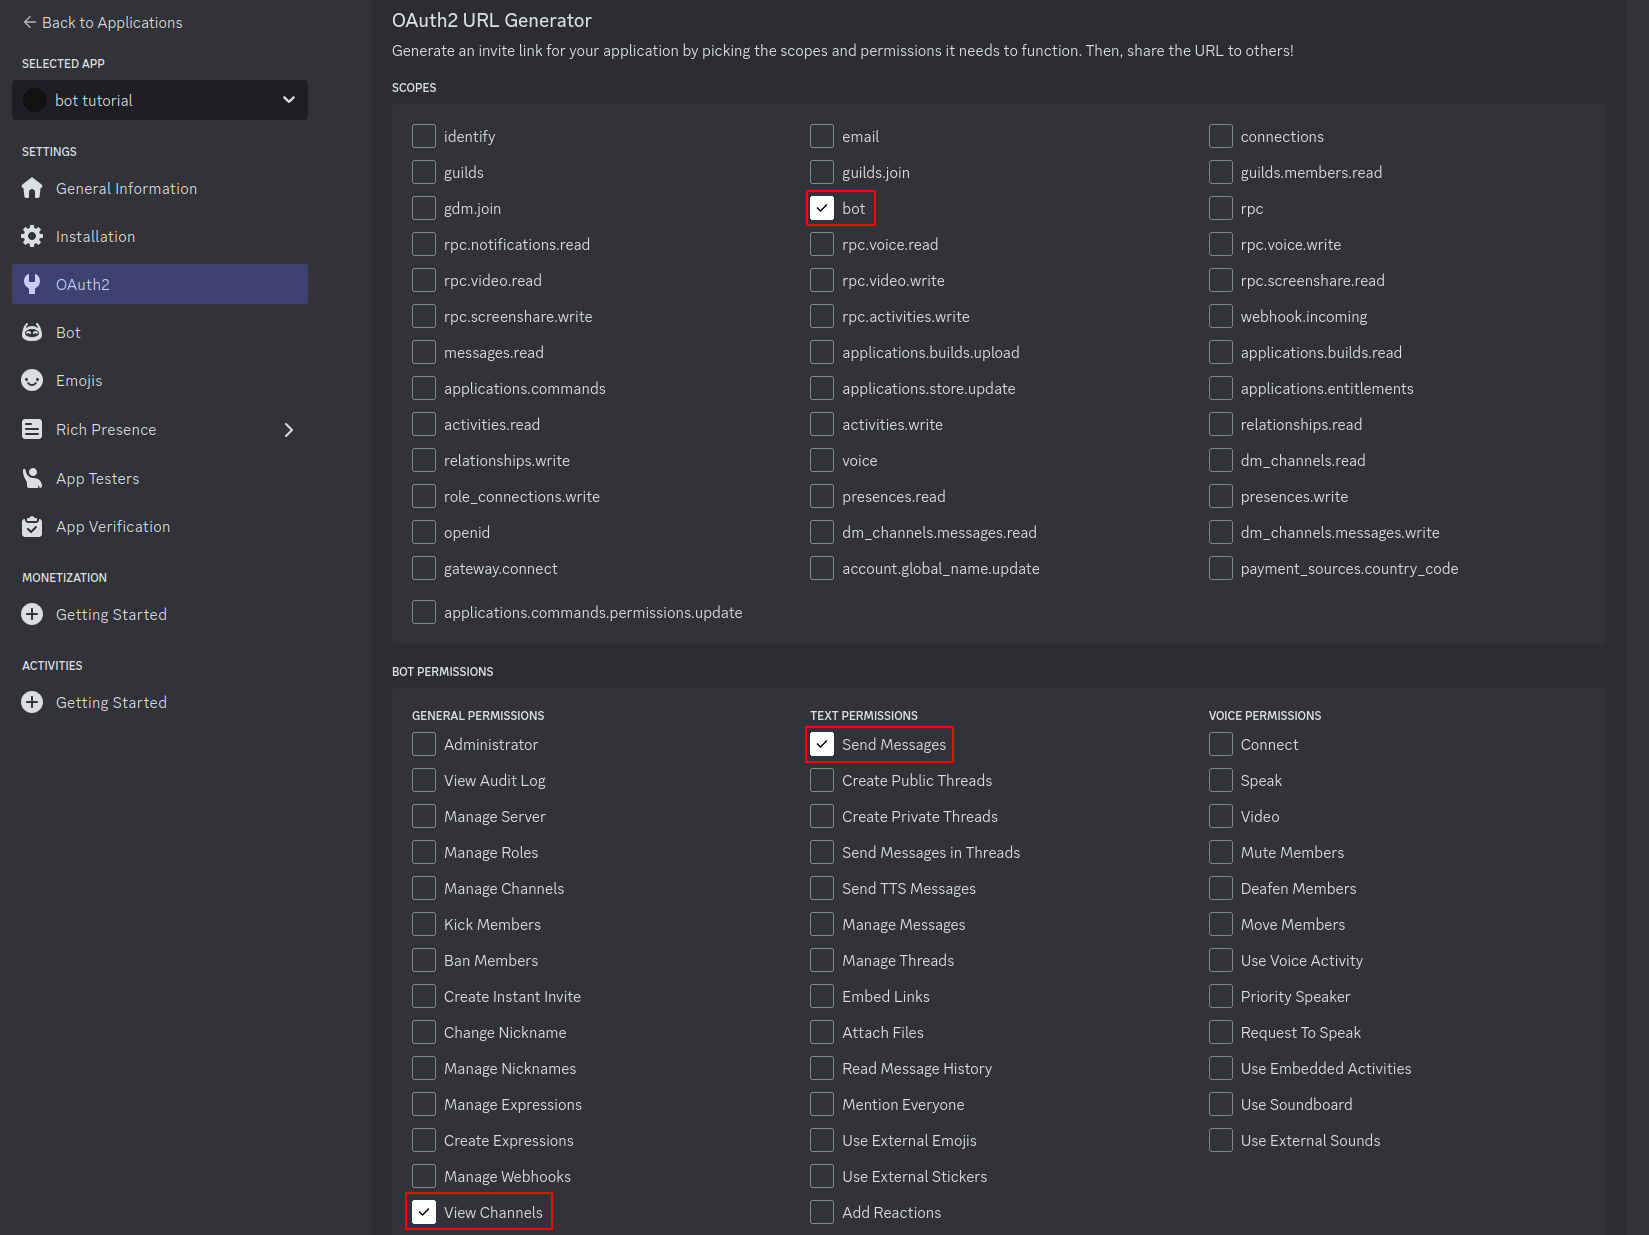 The Discord Developer Portal
Below the permissions list, you will find the generated URL. Copy this URL and paste it into your address bar to add the bot to your guild: 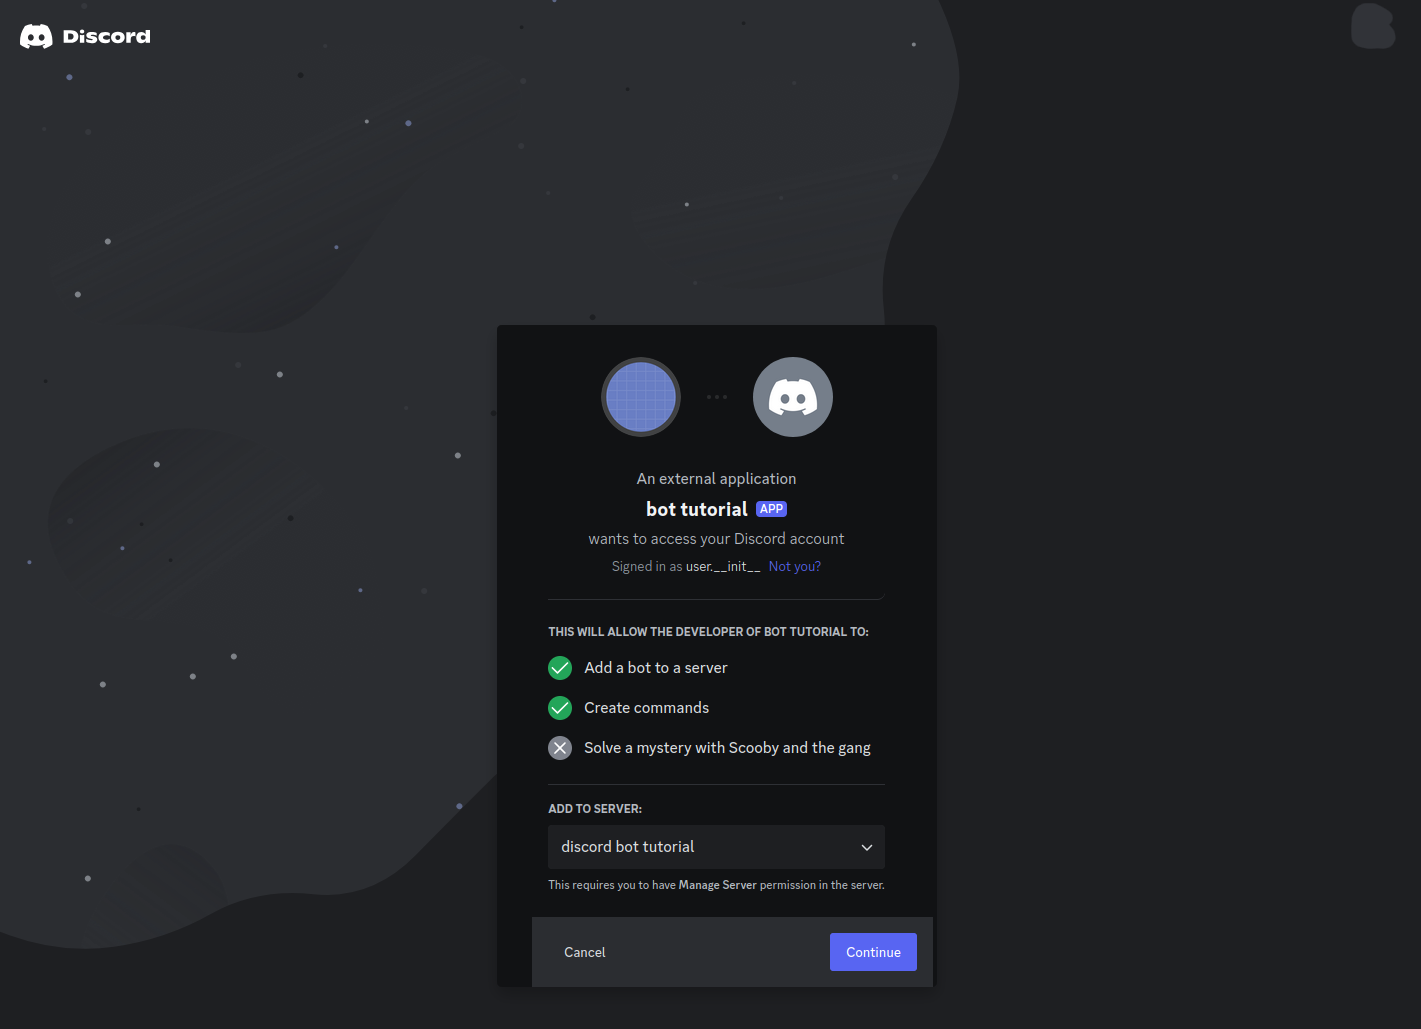 Add Discord bot to a guild
OpenWeatherMap API setup
The next important component for your Discord weather bot is the OpenWeatherMap API that will be used to get the weather data. To use the OpenWeatherMap API, you need to create an API key. To do so, go to the OpenWeatherMap API website and sign up for a new account. Once you have an account created, the API key will be available under the API keys tab.  The OpenWeatherMap API Dashboard
Python virtual environment
It is a good practice to use virtual environments when working on your projects as they allow you to separate your project dependencies from the system dependencies. To create virtual environments, you need to install the python-virtualenv package. Here are commands that you can use to install Python virtual environment package based on your system:
- Debian / Ubuntu:
sudo apt install virtualenv - Fedora:
sudo dnf install python3-virtualenv - openSUSE:
sudo zypper install python3-virtualenv - Arch Linux:
sudo pacman -S python-virtualenv
Getting started
Now that you have created a Discord application, set up an OpenWeatherMap API token, and installed a Python virtual environment, you can open your terminal and create a directory for your bot code:
1
2
mkdir discord_bot
cd discord_bot
The first thing you need to do is initialize a virtual environment:
1
2
python3 -m venv venv
source venv/bin/activate
This setup will allow you to install Python packages without conflicting with your host system.
For this tutorial, the discord.py module will be used. However, note that it is not the only module available for making Discord bots in Python.
1
pip install discord.py
Basic bot app
Let’s start by making a simple Discord bot that prints its username when launched. Create a new bot.py file (the file name can be anything with a .py extension) and open it in your preferred IDE or text editor:
1
touch bot.py
Here is an initial bot.py code:
1
2
3
4
5
6
7
8
9
10
11
12
13
14
import os

import discord

DISCORD_TOKEN = os.getenv('DISCORD_TOKEN')

intents = discord.Intents.default()
client = discord.Client(intents=intents)

@client.event
async def on_ready():
    print(f'Logged in as {client.user}')

client.run(DISCORD_TOKEN)
Breakdown
Now, let’s take a look at each line and understand what is happening in the code:
- Here, we are importing the os and discord modules into the Python script. The discord module was installed in the previous steps, whereas the os module is available in Python by default.
1
2
3
 import os

 import discord
- In this line, the Python script retrieves an environment variable named
DISCORD_TOKEN(more on that later) and stores it in a variable with the same name.1
DISCORD_TOKEN = os.getenv('DISCORD_TOKEN')
- Here, we are declaring Discord intents, which are a way to manage and control the events your Discord bot receives from the Discord API. On the next line, a Discord bot client is initialized. A client is an application that interacts with Discord’s API.
1
2
 intents = discord.Intents.default()
 client = discord.Client(intents=intents)
- In this snippet:
@client.eventis a decorator that registers an event. It tells the client that the following function is an event handler for the specified event.async def on_ready()defines an asynchronous function namedon_ready. This function is called when the bot has successfully connected to Discord and is ready to operate.print(f'Logged in as {client.user}')prints a message to the console, indicating that the bot has logged in successfully. Theclient.userattribute displays the bot’s username.1 2 3
@client.event async def on_ready(): print(f'Logged in as {client.user}')
- This line starts the bot and connects it to Discord using the
DISCORD_TOKENfor authentication.1
client.run(DISCORD_TOKEN)
When you run bot.py, you should see a similar output:
1
2
3
4
5
python3 bot.py

2024-07-25 12:10:14 INFO     discord.client logging in using static token
2024-07-25 12:10:15 INFO     discord.gateway Shard ID None has connected to Gateway (Session ID: abcdefabcdef1234567890abcdefabcd).
Logged in as weather_bot_tutorial#1234
Discord token
The DISCORD_TOKEN environment variable was mentioned earlier; however, what are environment variables, how do you set them, and where can you get a Discord token?
Environment variables
According to the Wikipedia article about environment variables: An environment variable is a user-definable value that can affect the behavior of running processes on a computer. Environment variables are part of the environment in which a process operates.
In Linux and macOS, you can set an environment variable in the terminal with:
1
export VARIABLE=value
For the Discord token, use:
1
export DISCORD_TOKEN=<your discord token>
Generate Discord token
To generate a Discord token, navigate back to the Bot tab in the Discord Developer Portal and click on Reset Token: 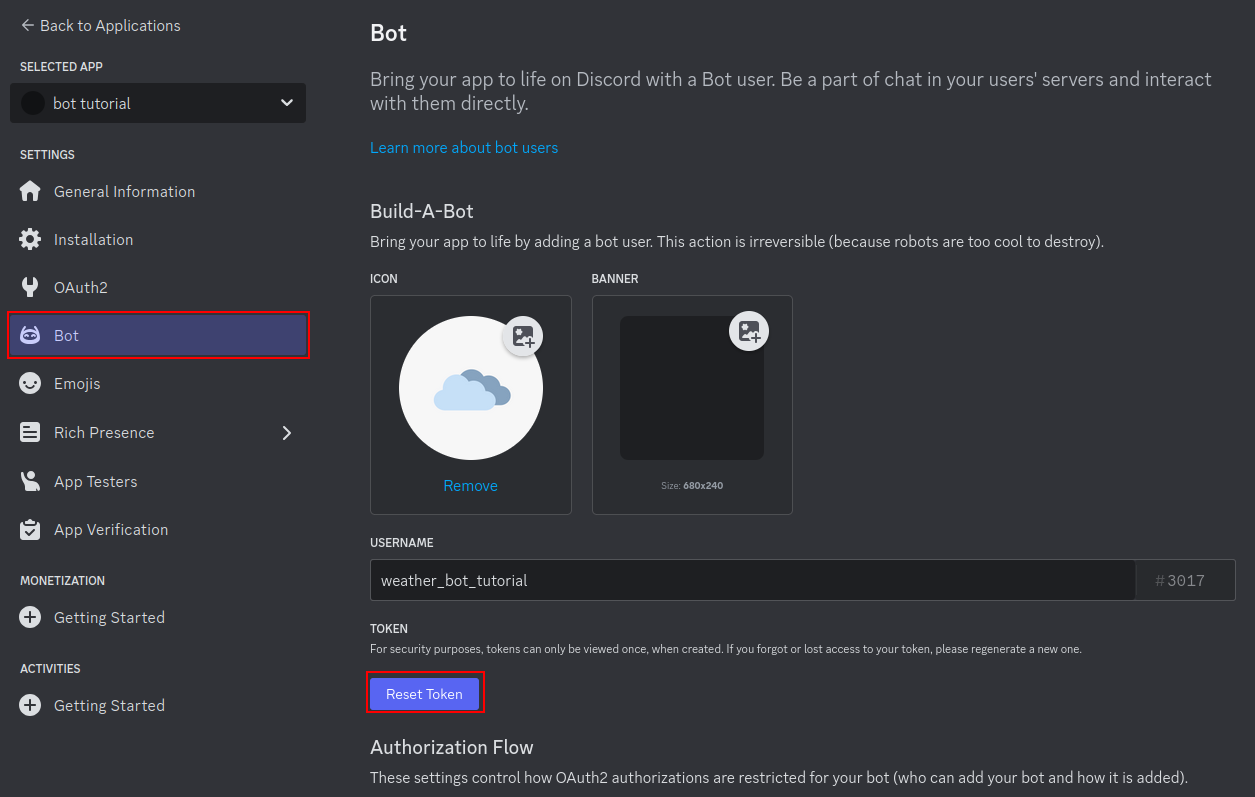 The Discord Developer Portal Bot tab
Adding commands
The main purpose of creating a bot is to add exciting commands that you can invoke using a slash (/). Considering that, let’s add a simple command which will reply to a user.
First, you will need to change some things. Client will be replaced with Bot since Bot allows creating custom chat commands in Discord:
1
2
3
4
5
6
7
8
9
10
11
12
13
14
15
16
import os

import discord
from discord.ext import commands


DISCORD_TOKEN = os.getenv('DISCORD_TOKEN')

intents = discord.Intents.default()
bot = commands.Bot(command_prefix='!', intents=intents)

@bot.event
async def on_ready():
    print(f'Logged in as {bot.user}')

bot.run(DISCORD_TOKEN)
Here are the things that have changed in this snippet:
- Renamed
clienttobot - Additional import:
1
from discord.ext import commands
- This allows us to create
botusingcommands.Bot, which will be used moving forward
- This allows us to create
- Creating
botusingcommands.Botinstead ofdiscord.Client - Added
command_prefixcommand_prefixis a symbol that is used to invoke a bot command without a slash
Alright, we have created the bot. Now, how do we add those slash commands? Just like on_ready, commands are added as functions:
1
2
3
@bot.tree.command(name='hello')
async def hello_command(ctx):
    await ctx.response.send_message(f'Hello {ctx.user.nick}!')
This creates a command, however, if you launch your bot, it will not have the /hello command available. To make it available, you need to sync the bot commands with Discord by adding bot.tree.sync() to the on_ready function:
1
2
3
4
@bot.event
async def on_ready():
    print(f'Logged in as {bot.user}')
    await bot.tree.sync()
Here are the changes:
@bot.tree.command(name='hello')is a decorator that registers a slash command namedhello.async def hello_command(ctx):declares a function that takes an interaction context as an argument.await ctx.response.send_message(f'Hello {ctx.user.nick}!')sends a response to the user who used the command with their guild nickname.await bot.tree.sync()syncs bot commands to Discord.
Calling OpenWeatherMap API
Great! You have successfully created your first Discord bot command. Now, it is time to make it more interesting by having the bot return the current weather for a requested location. We will begin by creating a simple client that will interact with the OpenWeatherMap API.
First of all, let’s create a new file:
1
touch weather.py
Before we start making API calls (HTTP requests), let’s install the requests and geopy Python modules:
1
pip install requests geopy
requests will provide us with convenient methods to fetch data from an external API, and geopy will allow us to retrieve geolocation information.
Now, let’s open weather.py and write an OpenWeatherMap API client:
1
2
3
4
5
6
7
8
9
10
11
12
13
14
15
16
17
18
19
20
21
22
23
24
25
26
27
28
29
30
import requests
from geopy.geocoders import Nominatim


class OpenWeatherMapAPIClient:
    def __init__(self, api_token, name):
        self.base_url = "https://api.openweathermap.org"
        self._api_token = api_token
        self.name = name

    def get_geodata(self, location):
        geolocator = Nominatim(user_agent=self.name)
        geodata = geolocator.geocode(location, language="en-us").raw

        return geodata["lat"], geodata["lon"]

    def get_current_weather(self, location, units="metric"):
        url = f"{self.base_url}/data/2.5/weather"
        lat, lon = self.get_geodata(location)
        params = {
            "lat": lat,
            "lon": lon,
            "units": units,
            "appid": self._api_token,
        }

        response = requests.get(url, params=params)
        data = response.json()

        return data
There’s quite a bit going on, so let’s break it down and explain each part of this client.
1
2
import requests
from geopy.geocoders import Nominatim
Here we are importing the modules we installed earlier.
1
2
3
4
5
class OpenWeatherMapAPIClient:
    def __init__(self, api_token, name):
        self.base_url = "https://api.openweathermap.org"
        self._api_token = api_token
        self.name = name
In this part, we are creating a class named OpenWeatherMapAPIClient. The __init__ method (short for initialize) is a function that is automatically run when you create a class instance. Within the __init__ method, we are setting a few class variables:
base_url- the base URL for the OpenWeatherMap API_api_token- the API token for the OpenWeatherMap APIname- a client name which we will use as a user-agent
1
2
3
4
5
def get_geodata(self, location):
        geolocator = Nominatim(user_agent=self.name)
        geodata = geolocator.geocode(location, language="en-us").raw

        return geodata["lat"], geodata["lon"]
In this function, we are using the Nominatim class from the geopy.geocoders module. This class allows fetching geodata from the nominatim.org API. The function returns the latitude and longitude for the given location name.
1
2
3
4
5
6
7
8
9
10
11
12
13
14
def get_current_weather(self, location, units="metric"):
    url = f"{self.base_url}/data/2.5/weather"
    lat, lon = self.get_geodata(location)
    params = {
        "lat": lat,
        "lon": lon,
        "units": units,
        "appid": self._api_token,
    }

    response = requests.get(url, params=params)
    data = response.json()

    return data
The get_current_weather function, as the name suggests, gets the current weather from the OpenWeatherMap API using the data/2.5/weather API endpoint. The data is returned in metric units by default, but this can be set to the following values:
standard- The temperature is returned in Kelvinmetric- The temperature is returned in Celsiusimperial- The temperature is returned in Fahrenheit
This function returns the OpenWeatherMap API response as a dictionary, which includes a wide range of data (API docs):
coordcoord.lon: Longitude of the locationcoord.lat: Latitude of the location
weather(more info Weather condition codes)weather.id: Weather condition idweather.main: Group of weather parameters (Rain, Snow, Clouds etc.)weather.description: Weather condition within the group. Please find more here. You can get the output in your language. Learn moreweather.icon: Weather icon id
baseInternal parametermainmain.temp: Temperature. Unit Default: Kelvin, Metric: Celsius, Imperial: Fahrenheitmain.feels_like: Temperature. This temperature parameter accounts for the human perception of weather. Unit Default: Kelvin, Metric: Celsius, Imperial: Fahrenheitmain.pressure: Atmospheric pressure on the sea level, hPamain.humidity: Humidity, %main.temp_min: Minimum temperature at the moment. This is minimal currently observed temperature (within large megalopolises and urban areas). Please find more info here. Unit Default: Kelvin, Metric: Celsius, Imperial: Fahrenheitmain.temp_max: Maximum temperature at the moment. This is maximal currently observed temperature (within large megalopolises and urban areas). Please find more info here. Unit Default: Kelvin, Metric: Celsius, Imperial: Fahrenheitmain.sea_level: Atmospheric pressure on the sea level, hPamain.grnd_level: Atmospheric pressure on the ground level, hPa
visibilityVisibility, meter. The maximum value of the visibility is 10 kmwindwind.speed: Wind speed. Unit Default: meter/sec, Metric: meter/sec, Imperial: miles/hourwind.deg: Wind direction, degrees (meteorological)wind.gust: Wind gust. Unit Default: meter/sec, Metric: meter/sec, Imperial: miles/hour
cloudsclouds.all: Cloudiness, %
rainrain.1h: (where available) Rain volume for the last 1 hour, mm. Please note that only mm as units of measurement are available for this parameterrain.3h: (where available) Rain volume for the last 3 hours, mm. Please note that only mm as units of measurement are available for this parameter
snowsnow.1h: (where available) Snow volume for the last 1 hour, mm. Please note that only mm as units of measurement are available for this parametersnow.3h: (where available)Snow volume for the last 3 hours, mm. Please note that only mm as units of measurement are available for this parameter
dtTime of data calculation, unix, UTCsyssys.type: Internal parametersys.id: Internal parametersys.message: Internal parametersys.country: Country code (GB, JP etc.)sys.sunrise: Sunrise time, unix, UTCsys.sunset: Sunset time, unix, UTC
timezoneShift in seconds from UTCcodInternal parameter
Putting this all together
Now that you have implemented a client to call the OpenWeatherMap API, let’s make the Discord bot use it. First of all, you will need to import your client in bot.py:
1
from weather import OpenWeatherMapAPIClient
Next, you need to get the OpenWeatherMap API token. For this, we will use the WEATHER_TOKEN environment variable:
1
WEATHER_TOKEN = os.getenv("WEATHER_TOKEN")
In a similar way as with the bot, you need to create a weather_client instance to interact with the OpenWeatherMap API. This instance will allow your Discord bot to fetch weather data:
1
weather_client = OpenWeatherMapAPIClient(WEATHER_TOKEN, "MyDiscordWeatherBot")
Next, you need to add a command to your Discord bot to fetch and display the current weather for a specified location. Define the command in bot.py:
1
2
3
4
5
6
@bot.tree.command(name="weather")
async def current_weather(ctx: discord.Interaction, location: str):
    current_weather = weather_client.get_current_weather(location)
    await ctx.response.send_message(
        f"Current weather in {location} is {current_weather['main']['temp']} °C"
    )
This command, named weather, takes a location as an argument and uses the weather_client to get the current weather data. The location argument specifies the desired location for the weather information, and the str type hint is required by discord.py. It then responds with a message with the current temperature in the provided location.
Some improvements
Awesome, you have created a bot that responds with weather information. The response is a plain message, which is boring. However, you can improve the weather command. Modify the bot to respond with an embed rather than a plain message:
1
2
3
4
5
6
7
8
9
10
11
12
@bot.tree.command(name="weather")
async def current_weather(ctx: discord.Interaction, location: str):
    current_weather = weather_client.get_current_weather(location)
    temp = current_weather['main']['temp']
    icon = current_weather['weather'][0]['icon']
    embed = discord.Embed(
        title=f"Current weather in {location}",
        description=f"Temperature: {temp}°C",
    )
    embed.set_thumbnail(url=f"https://openweathermap.org/img/wn/{icon}.png")

    await ctx.response.send_message(embed=embed)
discord.py allows you to send embedded messages, which provide a more visually appealing way to display information compared to regular messages. In addition, embeds can include a weather icon that reflects the current weather conditions. You can find more information about these icons here. Using embeds enhances the clarity and presentation of the weather data provided by your bot.
Final code
Here are final bot.py and weather.py scripts:
bot.py
1
2
3
4
5
6
7
8
9
10
11
12
13
14
15
16
17
18
19
20
21
22
23
24
25
26
27
28
29
30
31
32
33
34
35
36
import os

import discord
from discord.ext import commands

from weather import OpenWeatherMapAPIClient

DISCORD_TOKEN = os.getenv("DISCORD_TOKEN")
WEATHER_TOKEN = os.getenv("WEATHER_TOKEN")

intents = discord.Intents.default()
bot = commands.Bot(command_prefix="!", intents=intents)
weather_client = OpenWeatherMapAPIClient(WEATHER_TOKEN, "MyDiscordWeatherBot")


@bot.event
async def on_ready():
    print(f"Logged in as {bot.user}")
    await bot.tree.sync()


@bot.tree.command(name="weather")
async def current_weather(ctx: discord.Interaction, location: str):
    current_weather = weather_client.get_current_weather(location)
    temp = current_weather["main"]["temp"]
    icon = current_weather["weather"][0]["icon"]
    embed = discord.Embed(
        title=f"Current weather in {location}",
        description=f"Temperature: {temp}°C",
    )
    embed.set_thumbnail(url=f"https://openweathermap.org/img/wn/{icon}.png")

    await ctx.response.send_message(embed=embed)


bot.run(DISCORD_TOKEN)
weather.py
1
2
3
4
5
6
7
8
9
10
11
12
13
14
15
16
17
18
19
20
21
22
23
24
25
26
27
28
29
30
import requests
from geopy.geocoders import Nominatim


class OpenWeatherMapAPIClient:
    def __init__(self, api_token, name):
        self.base_url = "https://api.openweathermap.org"
        self._api_token = api_token
        self.name = name

    def get_geodata(self, location):
        geolocator = Nominatim(user_agent=self.name)
        geodata = geolocator.geocode(location, language="en-us").raw

        return geodata["lat"], geodata["lon"]

    def get_current_weather(self, location, units="metric"):
        url = f"{self.base_url}/data/2.5/weather"
        lat, lon = self.get_geodata(location)
        params = {
            "lat": lat,
            "lon": lon,
            "units": units,
            "appid": self._api_token,
        }

        response = requests.get(url, params=params)
        data = response.json()

        return data